Accidents Do Happen

So after four great posts about how to avoid collisions, now it's time to talk about collision detection.

Our characters are now successfully moving from point A to point B and usually avoiding each other. Just like in real life though, when it's crowded, people bump into each other. This looks like a job for Collision Detection!

The concept is pretty simple: in my sample, each entity is described by a circle, or more practically, a center point and a radius. We merely determine if they overlap or touch. Solved.

UNLESS you also want to know the point of collision and the force of the collision. Then you need some fancy vector math. Here's a great link to explain the details. I'll break it down into the important steps though.

Step 1: Did the objects collide?

This is easy math. We take the sum of the radii of each object (since they are all treated like circles). If the distance between their centers is less than sum of the radii, the objects have collided. Since the Math.sqrt() function is somewhat costly, it's faster to skip the square root when determining the distance and use the square fo the sum of the radii.

Step 2: What was the collision point?

Some more simple math. The collision occurs at a point directly between the centers of the two circles. DUH. If the objects have an equal radius it will be exactly between them. If they are different sizes though, we just use the radii to create a ratio*. If (x1,y1) and (x2,y2) are the centers then the collision point (x,y) can be calculated thus.

 And because this is true:
...point 1 and 2 can be reversed.

*Note: Since we only check for collisions each frame, this method does not account for the fact that the true time of collision actually happened between frames. Thus, the "true" collision point is usually different. However, for the sake of simplicity, this method is more practical.

Step 3: How hard did they hit?

Now we get some fancy math. When two objects collide, they exert force on each other and "bounce" like pool balls. Newton was a smart guy. This is the code to calculate everything. It returns the new velocity for the "guy" passed to the function. You can add that to his movement vector to simulate bounce, or apply it as the new velocity if it is free-floating in space.

function findCollisions(guy){
    var velx = 0;
    var vely = 0;
    var collided = false;
    //loop through all the other objects
    for (var c in dict){
        if (guy === c) continue; //skip yourself
        if (!dict[c].collisions) continue;//skip if collisions are off
        var haloSq = dict[guy].halo.cr + dict[c].halo.cr;
        haloSq *= haloSq; //use the square to save rooting...
        var dist = getDistanceSq(dict[guy].pos,dict[c].pos);
        if (dist.ds > haloSq) continue; //they did not collide
        else if (dist.ds <= haloSq) { //they collided
            //find the collision point
            var collisionPointX = ((dict[guy].pos.cx * dict[c].halo.cr) + (dict[c].pos.cx * dict[guy].halo.cr)) / (dict[guy].halo.cr + dict[c].halo.cr);
            var collisionPointY = ((dict[guy].pos.cy * dict[c].halo.cr) + (dict[c].pos.cy * dict[guy].halo.cr)) / (dict[guy].halo.cr + dict[c].halo.cr);
            //find the TOTAL velocity of the collision
            var xVelocity = dict[c].vel.vx - dict[guy].vel.vx;
            var yVelocity = dict[c].vel.vy - dict[guy].vel.vy;
            //use the dot product to calculate the "exit" velocity
            var dotProduct = -dist.x * xVelocity + -dist.y * yVelocity;
            if (dotProduct > 0){
                collided = true;
                var collisionScale = dotProduct / dist.ds;
                var xCollision = dist.x * collisionScale;
                var yCollision = dist.y * collisionScale;
                //The Collision vector is the speed difference projected on the Dist vector,
                //thus it is the component of the speed difference needed for the collision.
                var combinedMass = dict[guy].mass + dict[c].mass;
                var collisionWeightA = 2 * dict[c].mass / combinedMass;
                //var collisionWeightB = 2 * dict[guy].mass / combinedMass;
                velx -= collisionWeightA * xCollision;//new vel for dict[guy]
                vely -= collisionWeightA * yCollision;
                //new vel for activeGuyDict.Allies[c]...not necessary since it will be calculated on another pass
                //B.xVel -= collisionWeightB * xCollision;
                //B.yVel -= collisionWeightB * yCollision;
                //draw a green dot at the collision point
                ctx.fillStyle = "green";
                ctx.fillRect(collisionPointX-2,collisionPointY-2,4,4);
            }
        }
    }
    if (collided) return {nvx:velx,nvy:vely};//return the new vector to change after all collisions have been detected and calculated
    else return null;
}

This is a fully functioning script that demonstrates my own collision avoidance/detection algorithm at work. It isn't the fastest algorithm, but it functions well enough with 32 entities on the screen. For the purposes of my own demo, there will probably be no more than 12 characters on the screen at once, so this will do fine.

Instructions:

Press any key to load the entities.
Press R to organize them into a circle.
Press B to have them randomly switch places.
Press T to split them into 3 groups that will move to a target on the opposite side of the circle.
Press G to split them into two groups. They will organize into block formations.
Press B to have them exchange sides.
Press P to organize them into two vertical lines.
Press B to have them invert the line and switch sides.

The entities turn red after a collision, until they reach their target.

0 comments:

Point A to Point B: part 4

We can now move fluidly around groups of objects. Amazing! On to animation and sound!

Hold your horses! One more problem to solve.

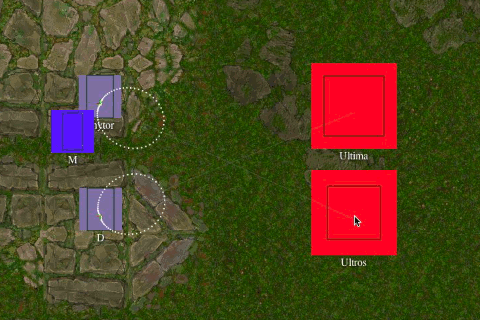
What if the obstacle we want to avoid is moving? I didn't realize this was a problem until THIS happened.

Each character is heading towards a different target, and since their paths cross, they get "locked" with each other. It's a classic "who goes first?" routine.

Abbott: After you...
Costello: Right, after Yu...
Abbott: No, I insist, after you!
Costello: That's what I said. After Yu!
Abbott: After me?
Costello: No. Yu, then Mi!
Abbott: Right. Me, then you...
Costello: NO! Yu before Mi. Then Hoo.
Abbott: I don't know. Who is there?
Costello: Hoo is already here.
Abbott: Just me and you. But who is going first?
Costello: No. First Yu, then Mi, then Hoo.
Abbott: I don't know, but I'm going anyway!
Costello: You can't! Not until Yu goes.
Abbott: I'll goes when I wants to goes!
Yu: Not yet! Wait for Mi!
Abbott: Who's that?
Costello: That's Yu!
Abbott: How can he be me?
Yu: I'm not Mi. I'm YU!
Abbott: Then who am I?!
Costello: Oh, hello, Mi!
Mi: Hello, Mr. Costello!
Costello: Yu, Mi, Mr. Abbott. (introducing them)
Mi: Hello. I'm Mi. Nice to meet you!
Abbott: Well at least you know who you are! Now who are YOU?
Hoo: I am Hoo.
Abbott: That's what I asked you.
Costello: Well, we better get going. After you. (indicating Yu)

Abbott takes a step towards the door at the same time as Yu. He has to stop to let Yu go. The same happens for Mi and Hoo. Abbott glares at Costello to let him go. Neither goes.

Costello: After you...
Abbott: Just GO ALREADY!

Path Crossing and Look-ahead

This problem took a lot more forethought than the others. I decided to take each character and assess the information he has available from his own point of view. That way his decision making process will be able to mimic that of people walking around. Here's what you know:

        - Your own target
        - Your direction and speed
        - The direction and speed of the "obstacle"

What you don't necessarily know is the target of the obstacle. But this should be enough information to make a relatively informed choice. So the question is, when do we adjust our path, and when don't we.

As people, if we see someone about to cross our path, we can judge our relative speeds and make an assumption about the likelihood of a collision at the point of crossing. The farther ahead we look though, the less accurate our prediction.

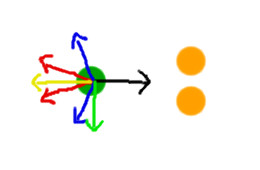
If we look ahead 40 animation frames, we can tell if our current trajectories cross, and if the obstacle's trajectory crosses our desired path to the target. By judging the speed of each object, we can tell who will hit the point of intersection first. We'll be polite and let whoever gets there first pass.
The black dashed lines indicate each object's desired path. The dotted lines represent their current trajectory. Since that is the only information BOTH parties can anticipate, we'll use it to determine who gets the right-of-way. The green dot will reach the point of intersection one frame sooner than the orange dot, so he gets to keep his current trajectory. So what do we do to adjust the direction of the orange dot?

My first thought was to have him "chase" the other, by flipping the red vector 180 degrees. That proved not to work well. Instead, I found that mirroring the red vector around the desired path as an axis got the desired result.
As you can see, by flipping the direction around the desired path as an axis (black dashes), it drastically changes his direction (red become dotted red). Keep in mind, the red vector is added back to the desired vector to produce the final direction. This works great to avoid a potential train wreck in scenarios like this. However there are some scenarios where we want to ignore a moving obstacle all together, like chasing.
Everyone loves a good chase. But if we have no chance of catching the obstacle we are following, then we might as well ignore its anti-gravity vector completely. What about a good ol' fashioned game of chicken?

Naturally we don't want a crash. Fortunately, the normal collision avoidance algorithm takes care of this. And with both objects trying to avoid each other, they do it quite effectively.

Here was my first attempt at making it all work.


Naturally, we need to scale down the adjustments as we near the time of intersection. This makes for a smooth transition out of the adjustment and back to normal collision avoidance. This is done by using ratios created with how close teach party is to the point of intersection.

 
There's a few bits of fancy math going on in this algorithm, starting with the calculation to find the time/point of intersect between the estimated trajectories.  This handy function takes two line segments as arguments and returns the point of intersection (or false for no intersection).

function pathIntersect(p1a,p1b,p2a,p2b){
    //input 4 points as arguments, 2 line segments
    //returns the intersect point if they collide or false if they do not
    var s1_x, s1_y, s2_x, s2_y,ix,iy;
    var s1_x = p1b.x - p1a.x;
    var s1_y = p1b.y - p1a.y;
    var s2_x = p2b.x - p2a.x;
    var s2_y = p2b.y - p2a.y;

    var s = (-s1_y * (p1a.x-p2a.x) + s1_x * (p1a.y-p2a.y))/(-s2_x * s1_y + s1_x * s2_y);
    var t = ( s2_x * (p1a.y-p2a.y) - s2_y * (p1a.x-p2a.x))/(-s2_x * s1_y + s1_x * s2_y);

    if (s >= 0 && s <= 1 && t >= 0 && t <= 1){
    // Collision detected, save the intersection point if necessary
    var ix = p1a.x + (t * s1_x);
    var iy = p1a.y + (t * s1_y);
    return {x:ix,y:iy};
    }
    return false; // No collision
}
Did you notice in the last gif that the vectors turning "D" are practically pointing in the wrong direction? The adjustment I found most useful was to rotate the vectors around the path, like a mirror image. Here's the handy function for that. It mirrors mvec around vec as an axis.

function mirrorVector(vec,mvec){ 
// mirrors mvec around vec as an axis
  //get a line for vec through origin:
    //y = vec.vy/vec.vx * x
  //get a perpendicular line through mvec:
    //y = (vec.vx/vec.vy) * x + (mvec.vy - ((vec.vx/vec.vy)*mvec.vx))
  //find the intersect point
  var iy = (mvec.vy + (vec.vx / vec.vy * mvec.vx)) / (1 + ((vec.vx*vec.vx)/(vec.vy*vec.vy)));
  var ix = vec.vx / vec.vy * iy;
  var newx = 2 * (ix - mvec.vx) + mvec.vx;
  var newy = 2 * (iy - mvec.vy) + mvec.vy;
  return {"vx":newx,"vy":newy};
}
In addition to these helpers, we must insert this code in the original "move" function.

av.vx = Math.cos(aTheta)*mag;
av.vy = Math.sin(aTheta)*mag;

//place this code after the above lines from part 3.
                        
////////experimental adjustment for crossing paths////////
var d40 = getVecLength(character.vel) * 40 + (character.w/2);//adjust this line!!!
// distance to obstacle must be less than velocity x 40 frames 
// delta must be between -90 and 90
// other guy must be moving, not stationary
if (d < d40 && dx > -Math.PI/2 && dx < Math.PI/2 && Obstacles[o].isMoving()) {
 var vv = crossPathFix(d40,d,vector,v,av,character,Obstacles[o]);
 v.vx = vv.v.vx;
 v.vy = vv.v.vy;
 av.vx = vv.av.vx;
 av.vy = vv.av.vy;
}

///////////End of experimental adjustment/////////////////
Here is the code for the fix. There are a few more helper functions at the bottom.

function crossPathFix (d40,dis,vector,v,av,guy1,guy2){
    //distance in 40 frames depending on current speed
    //distance to path crosser
    //desired vector
    //angle of path crosser
    //adjusted angle
//make line segments from current positions to anticipated position in 40 frames
 var g1 = guy1.lookAhead(vector);
 var g1v = guy1.lookAhead();
 var g2 = guy2.lookAhead();

 intersect = pathIntersect(g1.pos,g1.des,g2.pos,g2.des);//desired path and other's path
 intersect2 = pathIntersect(g1v.pos,g1v.des,g2.pos,g2.des);//current path and other's path
 ctx.strokeStyle = "hsl(30,50%,50%)";     
 ctx.beginPath();
 ctx.moveTo(g1.pos.x,g1.pos.y);
 ctx.lineTo(g1.des.x,g1.des.y);
 ctx.stroke();
 ctx.strokeStyle = "hsl(30,20%,20%)";
 ctx.beginPath();
 ctx.moveTo(g2.pos.x,g2.pos.y);
 ctx.lineTo(g2.des.x,g2.des.y);
 ctx.stroke();
 if (!intersect) {//
     var ratio1 = (1-(1.25*dis/d40))*(1-(1.25*dis/d40));
     if (dis/d40 > 0.8) ratio1 = 0;
     //account for the angle of direction too...are they heading toward or away from one another?
     var ng1 = normalize(guy1.vel);
     var ng2 = normalize(guy2.vel);
     var ratiod = -(((ng1.vx + ng2.vx) * (ng1.vx + ng2.vx)) + ((ng1.vy + ng2.vy) * (ng1.vy + ng2.vy)))/2 + 1;//between -1 and 1
  if (ratiod < 0) ratiod = 0;
  ratiod += ratio1;
  return {"v":{"vx":v.vx * ratiod,"vy":v.vy * ratiod},
                        "av":{"vx":av.vx * ratiod,"vy":av.vy * ratiod}};
 }
 //intersect2 is used to determine who should go first
 if (intersect2) {//the current paths also intersect
                //number of frames until intersect
  var t1 = getDistance(intersect2,g1.pos) / guy1.speed;
  var t2 = getDistance(intersect2,g2.pos) / guy2.speed;

 } else {
                //number of frames until intersect
  var t1 = getDistance(intersect,g1.pos) / guy1.speed;
  var t2 = getDistance(intersect,g2.pos) / guy2.speed;
  //if (t2 > t1 || t1 < 1) return {"v":v,"av":av};
 }

 //no adjustment if t1 < 1... nearly crossing the path
 // guy1 will cross the path first, no adjustment
 if (t2 > t1 || t1 < 1) return {"v":v,"av":av};

 var ratio = t2/t1;//between 0 and 1
 var ratio1 = (1-(1.25*dis/d40))*(1-(1.25*dis/d40));
  if (dis/d40 > 0.8) ratio1 = 0;
 var ratio2 = 3;// * ((d40 - (t1 *  guy1.speed)) / d40 + 1);//should yield ratio between 2 and 4
 if (t2 - t1 > 50) ratio2 = ratio2 * (1 - ((t2 - t1 - 50) / 50));
 if (ratio2 < 0) ratio2 = 0;
 if (t1 > 80) ratio2 = ratio2 * (120-t1)/40;
 //another adjustment to help ease the transition once their path is almost crossed
 if (t2 < 20 && !intersect2) ratio2 = ratio2 * (t2 / 20) * ratio;

 ratio2 += ratio1;
 
 var newv = mirrorVector(vector,v)
 var newav = mirrorVector(vector,av);
 return {"v":{"vx":newv.vx * ratio2,"vy":newv.vy * ratio2},
                "av":{"vx":newav.vx * ratio2,"vy":newav.vy * ratio2}};   
}
Helper functions and object constructor...

function getDistance(a,b){
//provided the x.y position of two objects, find the distance,
//cx and cy represent the center
    if (a.cx && b.cx){
        var x = b.cx - a.cx;
        var y = b.cy - a.cy;
    } else {
        var x = b.x - a.x;
        var y = b.y - a.y;
    }
    var d = Math.sqrt((x*x)+(y*y));
    return d;
}

///this goes in the constructor for each Obstacles object
    this.lookAhead = function(vector){
 if (vector) {
     var nx = vector.vx * 120 * this.speed + this.pos.cx;
     var ny = vector.vy * 120 * this.speed + this.pos.cy;
 } else {
     var nx = this.vel.vx * 120 + this.pos.cx;
     var ny = this.vel.vy * 120 + this.pos.cy;
 }
 return {"pos":{"x":this.pos.cx,"y":this.pos.cy},"des":{"x":nx,"y":ny}};
        //position and destination coordinates
    };

There it is. My complete algorithm to avoid obstacles! (Satisfaction not guaranteed).

 I intend to make a simple web app to demonstrate with full script available for download. Then I can test it out in extreme circumstances and see how it holds up. For the purposes of the game, there will probably be a maximum of 12 characters on the screen at once.

Stay tuned for a related issue: collision detection! Even with a great avoidance algorithm, collisions are inevitable. And frankly, they make games fun!

0 comments:

Point A to Point B: part 3

The problem solving continues. In part 1 we explored how to avoid objects in front of us, but not behind us. In part 2 we solved the issue of avoiding objects directly in our path.

Now what's wrong? THIS:


If you look carefully, there are two characters in the way, "Mickey" and "Talan". Since the art is so bad (sorry!) it's hard to tell, but they are perfectly the same distance from Shytor's path to the enemy, Ultros.

Didn't we already solve this? Well, no. We set the algorithm to adjust for something directly in our path, but not for two items creating equal but opposing anti-gravity forces.

Whether we use the direct anti-gravity force vectors (red lines) or the adjusted ones (blue lines) they cancel each other out because the obstacles are exactly the same distance from the path. While this may be a rare circumstance, we have to consider the implications. When faced with multiple objects to avoid, how do we choose which way to go?

The answer was actually a bit more simple than I originally thought. All we have to do is add the original anti-gravity vectors first, and then adjust the remaining vector, as if it was one obstacle to avoid.

The yellow line represents the sum of the original anti-gravity vectors (red). The green line represents the vector after the adjustment. Obviously we choose to go to the right, because that's the side of the road you should drive on (sorry British colonies!).

Now, no matter how many obstacles there are, we end up with two vectors to make our choice: first the sum of all the adjusted vectors, and the adjusted vector of the sum of the original anti-gravity vectors. Follow?

The sum of the adjusted vectors line is not visualized in the picture above. If it was, it would be a short vector pointing in the same direction as the yellow line.

But out of those two vectors, which do we use? In this scenario, we want to use "green", but in others we might want to use our previous algorithm. Here's a basic description of how it works.

Let's call the sum of adjusted vectors "B" (sum of the blue lines above) and the adjusted sum of vectors "A" (green line above). If we add them together, we get a new vector, X. Then we find the difference between this new vector and the angle to the target: we'll call it "delta". If delta is near 180, then we want to ignore either A or B. We can defer to A or B depending on the situation, if either vector is near 180 degrees from the target angle, we want to use the other. I used the following equation to scale the deferral smoothly (it's a quarter ellipse since "delta" is less than 180 degrees). We end up with a value between 0 and 1 that is multiplied by the B vector.
In code:

if (delta != 0) igFac = Math.sqrt(1 - Math.pow(((2 * delta) - Math.PI) / Math.PI,2));
else igFac = 0;

vector.vx += A.vx + (igFac*B.vx);
vector.vy += A.vy + (igFac*B.vy);

It could also be a linear scale to avoid using the costly Math.sqrt() function more than necessary. However, computers are getting faster, and I like smooth transitions. The result is this:


Notice that once he makes a choice to go right, the normal algorithm takes over since both obstacles are now to his left. Problem solved! What else could go wrong?

THIS:


This particular issue was actually a simple math error, but you get the idea. Here's the code.

function moveGuy(character){
    //sanity check, no movement if there is no target
 if (!character.target) return;
 
 //find the vector to the target and normalize 
 //then convert it to an angle in radians
 //the "pos" property contains x,y coordinates 
 var vector = normVec(character.pos,character.target.pos);
 var angle = Math.atan2(vector.vy,vector.vx);
    
    //declarations
 var d = 0;
 var delta = 0;
 var r = 0;
 //this is the sum of the anti-gravity, yellow line
 var AGSumx = 0;
 var AGSumy = 0;
 //this is the sum of the adjusted vectors, blue line
 var AdjAGSumx = 0;
 var AdjAGSumy = 0;

    //"Obstacles" is a dictionary of all obstacles to avoid
 for (var o in Obstacles){ 
        if (o === character.name) continue; //skip yourself
        if (o === character.target.name) continue;//skip your target
        //get the distance to the obstacle
        d = getDistance(character.pos,Obstacles[o].pos);
        
        //calculate the anti-gravity magnitude
        //the halo.cr property is the width with a buffer
        var mass = (character.halo.cr + Obstacles[o].halo.cr);
        //multiply by "personal space" constant for math fudging
        //this effects the strength of the antigravity
        var mass = mass * mass * 3;
        var mag = mass / (d * d);
        //v is anti-gravity vector (red)
        var v = normVec(Obstacles[o].pos,character.pos,mag);
        var av = {"vx":0,"vy":0}; //av is adjusted vector (blue)
        
        //angle for the red lines
        var vTheta = Math.atan2(v.vy,v.vx);
            var obsAngle = 0;//angle to the obstacle
            if (vTheta >= 0) obsAngle = vTheta - Math.PI;
            else if (vTheta < 0) obsAngle = vTheta + Math.PI;

        //get the difference between the angle to target and obstacle
        //correct it be between -180 and 180
        delta = obsAngle - angle;
            if (delta > Math.PI) delta = delta - (2*Math.PI);
            if (delta < -Math.PI) delta = delta + (2*Math.PI);
        //magnitude of the force is scaled based on direction
        r = (1 + Math.cos(delta))/2; //unit cardioid
        r = r * r * r;
            

        //get the difference between the target vector and antigravity vector
        delta = vTheta - angle;
            if (delta > Math.PI) delta = delta - (2*Math.PI);
            if (delta < -Math.PI) delta = delta + (2*Math.PI);

        //make the adjustment to get the blue lines
            if (delta != 0) {
                if (Math.abs(delta)>=Math.PI/2)var r2 = 1 - Math.sqrt(1 - Math.pow(((2 * Math.abs(delta)) - Math.PI) / Math.PI,2));//inverted quarter elipse
                else {var r2 = 0;}// if delta > 90 else 0
                var theta = Math.PI*r*r2/2;
                //one method of correcting the sign if the angles are negative
                var dir = Math.abs(delta)/delta;
                var aTheta = vTheta - (theta * dir);
            } else {
                var aTheta = vTheta;
            }
            
            //convert the blue line angle to a vector
            av.vx = Math.cos(aTheta)*mag;
            av.vy = Math.sin(aTheta)*mag;
                
        AGSumx += v.vx*r;//sum of red vectors (yellow) 
        AGSumy += v.vy*r;

        AdjAGSumx += av.vx*r;//sum of blue vectors
        AdjAGSumy += av.vy*r;
    }//end for loop
    
    //to fix the splitting issue, choose a direction.
    //this algorithm has to choose which of the vectors to use
    //so it's a bit more complex.
    //basically it scales vectors to 0 based on their direction relative to the target
            
        //magold is mag of yellow, magnew is mag of sum of blue
        var magold = Math.sqrt((AGSumx*AGSumx)+(AGSumy*AGSumy));
        var magnew = Math.sqrt((AdjAGSumx*AdjAGSumx)+(AdjAGSumy*AdjAGSumy));
        var newx = 0;//placeholder for the adjusted anti-gravity sum (green)
        var newy = 0;
        //only adjust the yellow if the magnitude is greater than the sum of blue
        if (magold >= magnew){
            //convert the vector ratio to an angle, between 90 and 0
            var newTheta = -(1-(magnew/magold))*(1/(magnew+1))*(Math.PI/2);
            //find the difference between the old vector and the target vector
            //is it between 90 and 180?
            var oldVangle = Math.atan2(AGSumy,AGSumx);//yellow line
            delta = oldVangle - angle;//diff from target vector to yellow
                if (delta > Math.PI) delta = delta - (2*Math.PI);
                if (delta < -Math.PI) delta = delta + (2*Math.PI);
            //translate dTheta from between 90 and 180 to a ratio
            if (Math.abs(delta) > Math.PI/2) {
                    //linear scaling
                    var axxx = (Math.abs(delta) - (Math.PI/2))/(Math.PI/2);
                    /square and give it a sign
                    axxx = axxx * axxx * (delta/Math.abs(delta));/
            } else { axxx = 0;
            }
                                    
            var finalAngle = newTheta * axxx;
            
            //calculate the adjustment, this is the green line
            newx = AGSumx*Math.cos(finalAngle) - AGSumy*Math.sin(finalAngle);
            newy = AGSumy*Math.cos(finalAngle) + AGSumx*Math.sin(finalAngle);
            newx *= 1 - (magnew/magold);//adjust magnitude based on inverted mag ratio
            newy *= 1 - (magnew/magold);
            newx *= 1/(magnew + 1);
            newy *= 1/(magnew + 1);
            newx *= Math.abs(axxx);//if the old vector isn't near 180, don't add it
            newy *= Math.abs(axxx);
        }
        
        //this scales out the sum of adjusted vectors
        //first get the sum of both the adjusted vectors
        var igAng = Math.atan2(newy + AdjAGSumy,newx + AdjAGSumx);
        //find the difference between this combined vector and the target vector
        delta = Math.abs(igAng - angle);
                if (delta > Math.PI) delta = (2*Math.PI) - delta;
        //if it's near 180 degrees from the target vector, we don't use it
        //the sum of blue will be fine
        if (delta != 0) var igFac = Math.sqrt(1 - Math.pow(((2 * delta) - Math.PI) / Math.PI,2));//quarter ellipse equation
        else var igFac = 0;    

    //the movement vector is green vector + sum of blue vectors scaled
    vector.vx += newx + (igFac*AdjAGSumx);
    vector.vy += newy + (igFac*AdjAGSumy);
    //normalize the vector, so it can be used for movement
    vector = normalize(vector);
    //set the movement vector for next frame
    //then move on to the next character
    character.nextmove(vector);
}
Part 4 comes with the thrilling conclusion and something I initially failed to consider at all: moving obstacles!

0 comments:

Point A to Point B: part 2

Okay. So we solved the issue of optimizing our anti-gravity obstacle avoidance algorithm by using a cardioid. What problem could possibly be next?

Well, how about, what happens if the obstacle is straight ahead?

Choosing Left or Right


It is possible, and even likely, that the obstacle will be directly in the path of the character. So if anti-gravity of the obstacle is pushing in the exact opposite direction of the movement vector, what happens when you get too close to the obstacle?
The forces eventually cancel out, or it's possible that the anti-gravity will exceed the movement vector. Normally the obstacle is outside the direct path, and the character gets nudged more and more as he moves closer, eventually rolling around. But with perfect math in a digital game, THIS is possible.


The solution is simple to you or me... just pick a direction and go around, duh?! But computers aren't so clever... they need to be told what to choose.

In this perfect scenario, the angle of anti-gravity is exactly 180 from the angle of the path. Ideally, this is when we want to adjust our path the most, since there is something REALLY in our way. So, let's just adjust the angle of anti-gravity by 90 degrees!
The red line is the initial anti-gravity vector, the blue line is the new adjusted version.

Done. Solved! Wait, but now we are making a huge adjustment. As soon as the obstacle is not directly in our path (probably after one frame) we'll only be making the same small adjustment... so let's scale the adjustment. If the angle of anti-gravity is off by 180 degrees, we adjust a lot, if it is off by 90 or less, we don't adjust.
Here's the code:

//get the difference between the path vector and the obstacle
//invert it as necessary get a result between -180 and 180
delta = vTheta - angle;
if (delta > Math.PI) delta = delta - (2*Math.PI);
if (delta < -Math.PI) delta = delta + (2*Math.PI);
            
    if (delta != 0) {
        //this creates an inverted quarter ellipse 
        //that we use to scale the adjustment smoothly
 if (Math.abs(delta)>=Math.PI/2)var r2 = 1 - Math.sqrt(1 - Math.pow(((2 * Math.abs(delta)) - Math.PI) / Math.PI,2));
 else {var r2 = 0;}// if delta > 90 degrees

        var theta = Math.PI*r*r2/2;
        //one method of correcting the sign if the angles are negative
        var dir = Math.abs(delta)/delta;
        var aTheta = vTheta - (theta * dir);
    } else {
        var aTheta = vTheta;
    }

//this calculates the vector of the new blue line
//as seen in the diagrams above
av.vx = Math.cos(aTheta)*mag;
av.vy = Math.sin(aTheta)*mag;
//then add these to the movement vector! 
The result is a nice fluid movement around the object. It even makes the path react a bit sooner, so your character isn't waiting to the last minute to make a reasonable adjustment. In this code, it chooses left (d*mn hippy!).


Done. Solved! Or not. Stay tuned for part 3, where I discuss another scenario we must overcome. What if there are 2 obstacles perfectly evenly spaced directly in our path?

0 comments:

Point A to Point B: part 1

Welcome to my very first post! What is this blog about, you ask? Let's get right down to it.

I'm a composer, who wants to make a game, or at least a demo. I'll talk more about what my idea is with each post, but for now we'll focus on the basics, since that's about all my programming skills can handle.

I'm using javascript as my language for now, but we'll see where this goes.

The game will be a top-down strategy/RPG style game. In order to manage a team of characters, they will have to have some kind of individual movement AI. For nearly all the actions, the character will have to move from point A to point B on his/her own. Attacking is the most fun action, so here we go...

Action one: Attack.

You choose a "Hero", then choose an enemy. The Hero walks over, body-slams the sh*t out of the enemy and walks back to his home position. Easy, right? But what if there is something in his way?

When I first researched solutions for this simple problem (oh, how naive I was) I first encountered information about path-finding, and A* algorithms. Once my head stopped spinning, I stumbled across a much more elegant solution: vector fields.

To simplify the explanation, imagine each obstacle has anti-gravity. The closer you get to it, the more it "pushes" you away. This is nice, because as your movement vector pushes you in one direction, the force of the "anti-gravity" pushes you away, and eventually around said obstacle.

To illustrate, the green ball is moving to the right. As it approaches the obstacle, the obstacle exerts its "force" and pushes the ball away. As you can see in the exquisite to-scale drawing, the force is stronger based on proximity.


Great! Problem solved. NEXT!

Or not. Here's the issue (the first of many). The anti-gravity is exerted in all directions equally, which so as the green ball moves past the orange one (to the point where the orange ball is no longer an obstacle) he is STILL affected by its anti-gravity. Now, why would you want to avoid an obstacle you've already passed?

Well, some programmers have solved this by using a complex "look-ahead" to see just how in-the-way the obstacle is. But I found a much simpler solution. Math-geeks, prepare yourselves!

Cardioids

I heart cardioids. No, seriously. If you don't know what one is, plug this equation into a graphing calculator.
Imagine that normal anti-gravity is calculated in a circle (i.e. objects in all directions are treated equally) so why not use a cardioid? This allows us to calculate 100% anti-gravity on objects directly in our path, and scale to 0% for objects behind us. And multiplying the cardioid by a power increases the effect. These images show the circle vs. cardioid being applied to the moving player, aimed in the direction of the target.

"Shytor" is moving to the left. "M" is at 45 degree angle to his motion, so is sort of in the way. The colored lines represent the forces exerted on him due to anti-gravity. His resulting vector pushes him down a little, to avoid M.

Here, "Shytor" and "D" are moving toward their target, "Ultros". The colored lines protruding from Shytor represent the forces of anti-gravity exerted on him (I'll explain those in detail later). Both M and D are in his way (a little). D has nothing directly in his way, so there are no colored lines (very tiny ones). Without the cardioid, D would be more affected by M, but due to the scaling, the effect is negligible.

The result is a change in overall path. Notice the "circle" path continues to push away from orange ball, even after it is passed. Whereas, the cardioid, straightens out once it is clear. The perfectly to-scale anti-gravity vector lines (in red) show how the effect diminishes greatly as the green ball passes its target.

So that's the explanation. SHOW ME THE CODE!

This code would run each frame, and can be looped if there are multiple obstacles present. The "orange" object is the obstacle.

function moveObject(green,orange){
//first get the normalized vector of green's target 
//(i.e. which direction is he trying to move)
//this returns vector object with vx and vy properties
    var vector = normVec(green.pos,green.target.pos);
//convert the vector to an angle in radians, 0 is East
    var angle = Math.atan2(vector.vy,vector.vx);

//get the distance to the obstacle
    d = getDistance(green.pos,orange.pos);

//calculate the anti-gravity magnitude based on distance
//it's not really the mass, but the "width" of the obstacle
    var mass = (green.radius + orange.radius);
//multiply by "personal space" constant for math fudging
//this adjusts the strength of the anti-gravity
    var mass = mass * mass * 2;
//the magnitude of the effect as distance approaches the "mass" is 1 
    var mag = mass / (d * d);

//find the angle between the two objects (as an "x, y" vector)
//multiplying by the magnitude
    var v = normVec(orange.pos,green.pos,mag);
//convert the angle to radians
    var vTheta = Math.atan2(v.vy,v.vx);
//invert it to get the "anti-gravity force"
    var obsAngle = 0;
    if (vTheta >= 0) obsAngle = vTheta - Math.PI;
    else if (vTheta < 0) obsAngle = vTheta + Math.PI;

//get the difference between angles to the target and the obstacle
    delta = obsAngle - angle;
//invert if more than 180 deg, this keeps the value in a usable range
        if (delta > Math.PI) delta = delta - (2*Math.PI);
//invert if less than -180
        if (delta < -Math.PI) delta = delta + (2*Math.PI);

//make a unit cardioid, if the difference in angles is 0 effect is 1
//if angle is 180 effect is 0
    r = (1 + Math.cos(delta))/2;
//multiply the magnitude exponentially (optional)
    r = r * r * r;

//add the calculated anti-gravity force to the original vector
vector.vx += v.vx*r;
vector.vy += v.vy*r;

//after all anti-gravity is calculated then move the character
vector = normalize(vector);//normalize the new movement vector
//then call the movement function of the character
//basically multiply the direction vector by speed
//and move to the next frame
green.move(vector);
}

//helper functions
        function getDistance(a,b){
//provided the x.y position of two objects, find the distance
//cx and cy represent the center
                var x = b.cx - a.cx;
                var y = b.cy - a.cy;
                var d = Math.sqrt((x*x)+(y*y));
                return d;
        }
        function normVec(a,b,mag){
//find the direction vector between two points, multiplied by mag
                    if (!mag) mag = 1;
                var x = b.cx - a.cx;
                var y = b.cy - a.cy;
                var d = Math.sqrt((x*x)+(y*y));
                var v = {"vx": x / d * mag,"vy": y / d * mag};
                return v;
        }
        function normalize(v){
//normalizes a vector object to 1
                var d = Math.sqrt((v.vx*v.vx)+(v.vy*v.vy));
                var v = {"vx": v.vx / d,"vy": v.vy / d};
                return v;
        } 

Stay tuned for part 2 where I solve the next problem: choosing left or right!

The tile artwork is from "Wilderness Tile Set" art by Daniel Cook (Lostgarden.com). Thanks to him for making some great free artwork available!

0 comments: